
Contents
1. Installation
GhostTrails is supplied as a downloadable file in zip format. Installation is a straightforward process
Step 1
Download the correct zipfile for your version of 3dsmax from the Download page.
Step 2
Extract the zipfile and select the correct plugin for your version of 3dsmax. The various builds of GhostTrails have different names that tell you which version of 3dsmax they are for.
GhostTrailsMax2020_64.dlm |
for 3dsmax2020 64-bit |
GhostTrailsMax2019_64.dlm |
for 3dsmax2019 64-bit |
GhostTrailsMax2018_64.dlm |
for 3dsmax2018 64-bit |
GhostTrailsMax2017_64.dlm |
for 3dsmax2017 64-bit |
GhostTrailsMax2015_64.dlm |
for 3dsmax2015 and 3dsmax2016 64-bit |
GhostTrailsMax2013_64.dlm |
for 3dsmax2013 and 3dsmax2014 64-bit |
GhostTrailsMax2012_64.dlm |
for 3dsmax2012 64-bit |
GhostTrailsMax2012_32.dlm |
for 3dsmax2012 32-bit |
GhostTrailsMax2010_32.dlm |
for 3dsmax2010/2011 32-bit |
GhostTrailsMax2010_64.dlm |
for 3dsmax2010/2011 64-bit |
GhostTrailsMax2009_32.dlm |
for 3dsmax2009 32-bit |
GhostTrailsMax2009_64.dlm |
for 3dsmax2009 64-bit |
GhostTrailsMax9_64.dlm |
for 3dsmax9 and 3dsmax2008 64-bit |
GhostTrailsMax9_32.dlm |
for 3dsmax9 and 3dsmax2008 32-bit |
GhostTrailsMax6.dlm |
for 3dsmax6, 3dsmax7 and 3dsmax8 |
Step 3:
Copy the GhostTrails plugin to the 3dsmax plugins directory. This is the \plugins subdirectory of your 3dsmax installation. For example, if 3dsmax is installed in C:\3dsmax2009 then you should copy the plugin to C:\3dsmax2009\plugins.
Step 4:
Restart 3dsmax. GhostTrails should now be available. You can check by creating a spline or shape object (remember that GhostTrails only works on splines or shapes) and seeing if GhostTrails appears in the modifier list.
2. Main Panel
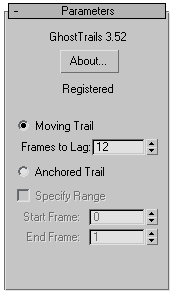
About Button
This button pops up a dialog that displays version and license information about GhostTrails. If GhostTrails is unregistered, this dialog will also display the Register... button and allows you to enter your registration code.
UPDATE: You no longer need to purchase a registration code. GhostTrails is now completely free. Enter the code below to enable all registered features.
E8C18FB749BA820E0525422425AFBED057AD5AEB7FE98E2F17C688B869B454
Moving Trail / Anchored Trail:
Anchored Trails not available in unregistered versionA trail can be one of two types. A Moving Trail is drawn from the object's current position back along its path of motion to its position a certain number of frames in the past. The length of the trail is controlled by the Frames To Lag spinner, which controls how many frames into the past the trail is drawn.
For example, a moving trail of an object on frame 10 and with a Frames To Lag setting of 4 would extend from the object's position on frame ten, back to its position on frame 6 (passing through its positions on frames 9, 8 and 7 along the way).
The other type of trail is the Anchored Trail. By default an anchored trail is drawn from the object's position at the start of the current active time range (usually frame 0) to the object's position on the current frame.
It is possible to change the time range over which the anchored trail is drawn by checking the Specify Range box and filling in the desired time range using the Start Frame and End Frame spinners.
Enable Debug Logging
This feature is used to help the GhostTrails developers diagnose crashes and other problems. If turned on, it will write a log file to My Documents\GT.log. This logging will generate a lot of data and slow down the operation of GhostTrails, so don't turn it on unless we've asked you for the log file.
3. Mesh Parameters
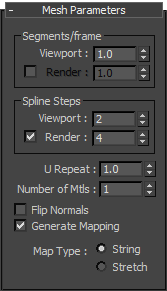
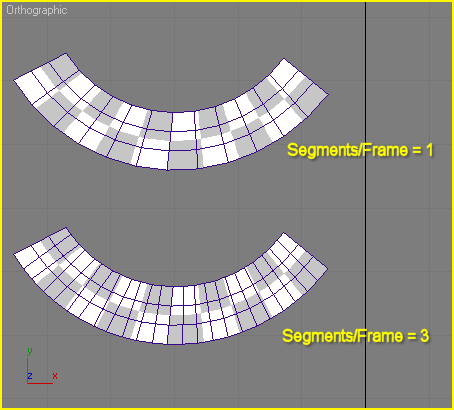
Segments/Frame:
Not available in unregistered versionThe Segments/Frame spinner controls the level of mesh detail along the length of the trail. By default this value is 1, which means that GhostTrails will create one set of faces per frame.
If the trail object is moving quickly or changing direction abruptly, generating only one segment per frame can make the trail look jagged. If this happens you can make GhostTrails generate segments on subframe intervals by increasing the Segments/Frame value.
Be aware that generating more segments uses up more memory (especially for long trails) so it's a good idea to set it to the lowest possible value that still gives you a smooth mesh.
NEW!The Segments/Frame controls let you set different values for viewport and rendering. To set a different value at render time, click the check box and change the "Render" field.
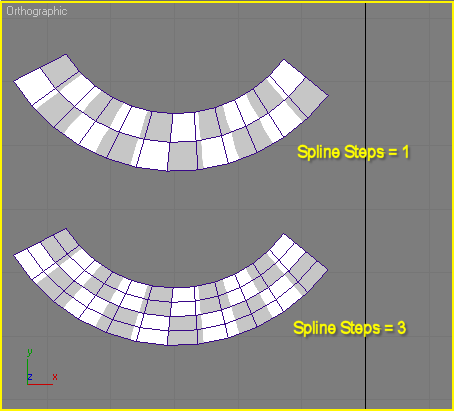
Spline Steps:
The Spline Steps spinner controls the level of mesh detail across the trail. It works the same way as the Segments spinner in the Extrude modifier. If the spline you've used for the trail is curved you can make the trail look smoother by increasing this parameter.
NEW!The Spline Steps controls let you set different values for viewport and rendering. To set a different value at render time, click the check box and change the "Render" field.
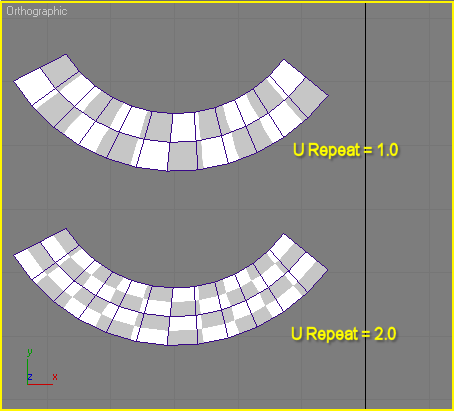
U Repeat:
Not available in unregistered versionThe U Repeat spinner controls how many times the U mapping coordinates repeat across the trail.
Number of Mtls:
This setting is mainly useful for particle trails. When GhostTrails is generating multiple trails it will apply a different Material ID to each trail by cycling through the number of ID specified in the Number of Mtls spinner. You can then apply a Multi/Sub-Object material to the GhostTrails object to assign different materials to each trail.
This option can be overriden by the Use PFlow Material IDs setting (see below)
Flip Normals:
This setting flips the normals on the trail. Note that (for historical reasons) the default normal direction on Moving and Anchored trails is different. If you switch a trails from Moving to Anchored you might find you also need to change the Flip Normals setting.
Generate Mapping:
This setting controls whether UV coordinates are generated for the trail mesh. If you don't need to map the trail, you can save some memory by turning this feature off.
GhostTrails maps trails by assigning V coords along the direction of motion of the trail from 0-1, and U coords along the spline shape of the trail from 0-1 (possibly modified by the U Repeat setting).
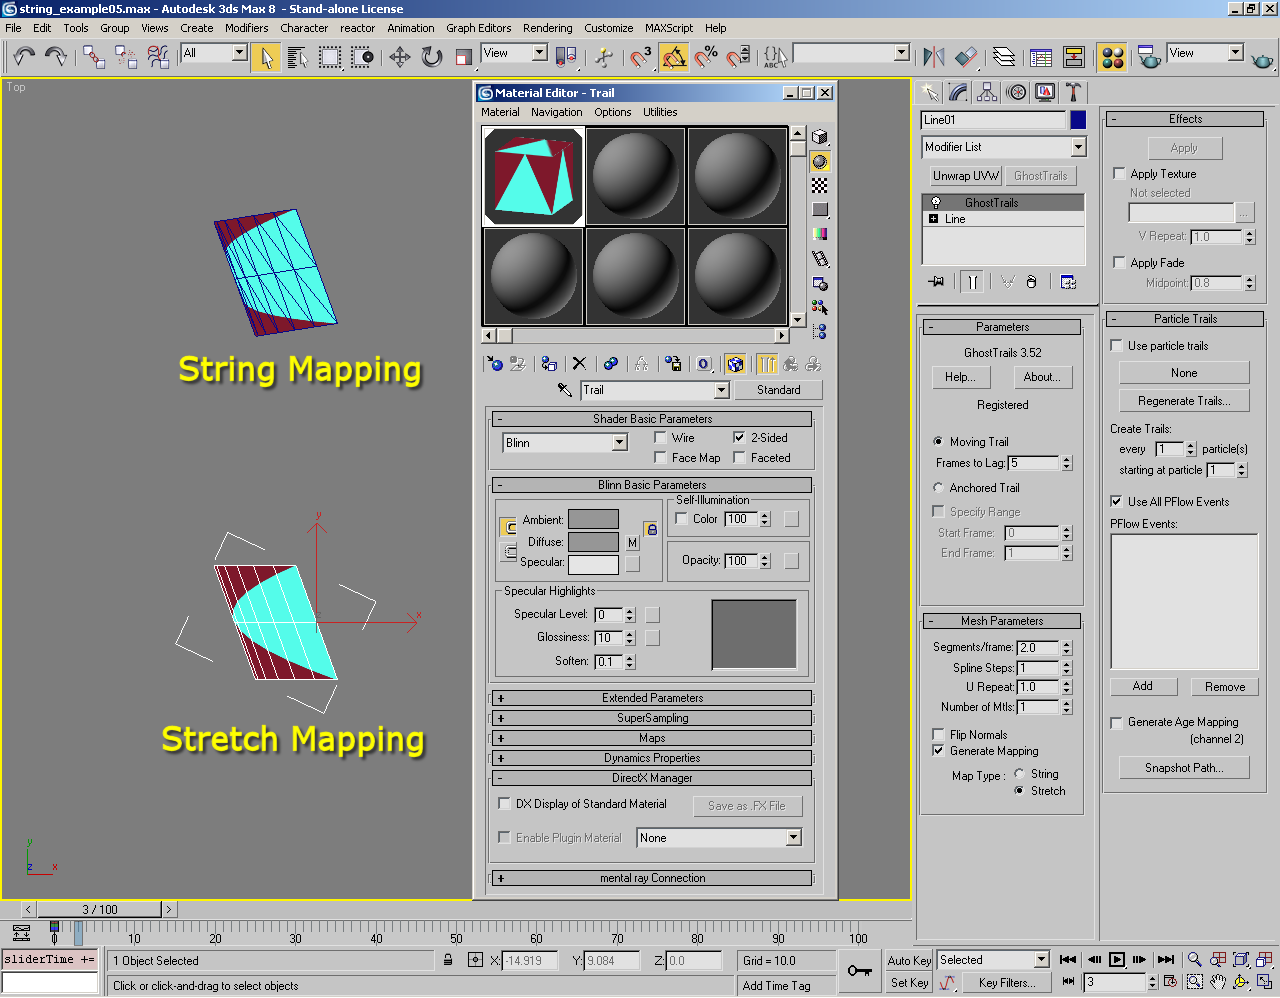
Map Type:
This is quite a subtle effect that changes the way the mapping coordinates are done for trails that have just started moving from a stationary position but haven't reached their full length yet.
String mapping maps the UV coords along the entire length of the trail - even if the whole trail isn't visible yet. Think if the trail as a pile of string tied to the spline that's being pulled out as the spline moves.
Stretch mapping maps the UV coords along the length of trail that is currently visible. It means you can always see the entire map applied to the trail. Think of the trail as a piece of rubber that starts stretching as you pull on the spline its attached to.
This setting only affects moving trails.
4. Effects Panel
Not available in unregistered versionFor moving trails it is quite common to assign a material that gradually fades to transparent over the length of the trail. The Effects panel contains controls that let you create and assign this sort of material in less steps then using the material editor.
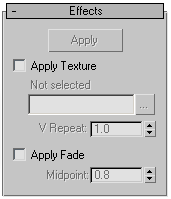
The Apply Button
This button creates a new material from the settings you have selected and applies it to the GhostTrails object.
Apply Texture
If you check this box and select a bitmap file, the generated material will contain it as a Bitmap texture in the Diffuse map slot. The V Repeat setting will set how many times the bitmap repeats along the length of the trail.
Apply Fade
If you check this box, then the generated material will have a Gradient texture in the Opacity map slot arranged so that the trail fades to transparent along its length. The Midpoint value sets the Color 2 Position of the gradient texture.
5. Particle Trails
GhostTrails is able to draw trails based on the motion of the particles of a particle system as an alternative to using the animation of a spline object, drawing a trail for every particle.
GhostTrails supports all the particle system types that are included in 3dsmax, including Particle Flow. In general, third party particle system plugins will not work with Ghost Trails.
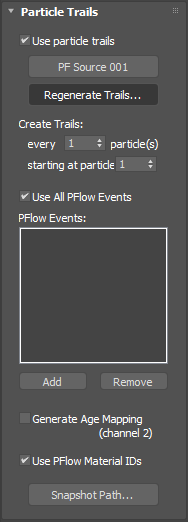
Use Particle Trails
Check this box to turn on particle trails. GhostTrails will now generate trails from particle motion instead of the motion of the spline object you've applied the GhostTrails modifier to. Note that you won't acutally see anything until you've selected a particle system and regenerated the trails (see below).
Select Particle System ("None" button)
This button is a standard 3dsmax picker button which allows you to select which particle system in the scene to generate trails from. If you have not yet selected a particle system the button will display "None".
To select a particle system, click on the button then click on a particle system in your scene.
Regenerate Trails
Limited to frames 0-50 in unregistered versionBecause generating the trails for a particle system is quite computationally expensive, GhostTrails doesn't try to update itself on the fly as you change the animation parameters of the particle system. Instead the trails are generated whenever you press the Regenerate Trails button using the current settings of the particle system.
If you change the particle system parameters you have to press the button again to make GhostTrails pick up the changes.
To make this a little easier to automate, GhostTrails allows you to script the Regenerate Trails function via MaxScript by exposing the regenerate_particle_trails method. For example, the MaxScript line:
$.modifiers[#GhostTrails].regenerate_particle_trails()
will regenerate the particle trails on the currently selected object.
Create Trails
If you don't want to create a trail for every particle you can reduce the number of trails created to one every 2nd, 3rd particle etc. by increasing the value of the Every n Particles spinner.
The Starting at Particle n spinner lets you skip some particles at the start. The main use of this is to allow you to attach multiple GhostTrails objects to the same particle system and have them all generate trails for different particles. For example, if you set up three different splines to generate trails every 3 particles and then set the Starting at Particle n setting to be 1, 2 and 3 respectively on each object, then the first object will have trails for particles (1, 4, 7, 10...), the second for (2, 5, 8, 11,...) and the third for (3, 6, 9, 12...) and so on.
(If you make changes to these settings you need to press the Regenerate Trails button to see the changes.)
Particle Flow Settings
The Particle Flow particle system divides particle generation into one or more Events. GhostTrails can optionally generate trails for a subset of the events in the particle flow system.
If the Use All PFlow Events box is checked, then trails are generated from all events. If you uncheck the box, then only the events in the PFlow Events list will be used to generate trails. You can add or remove events from the list using the Add and Remove buttons.
These settings only have an effect if the particle system you're using is a Particle Flow.
(If you make changes to these settings you need to press the Regenerate Trails button to see the changes.)
Generate Age Mapping
If you check this box, then GhostTrails will generate a second set of UV coordinates for each particle trail in UV channel 2. The U coordinate is mapped from 0 to 1 along the length of the spline used to form the trail.
The V coordinate is mapped from 0 to 1 along the length of the trail depending on the age of the particle at the time the trail first becomes visible. What this means is that a section of particle trail will always have the same UV coordinates once it is generated, and won't change over time.
This sample scene shows an example of the difference between age mapping and regular mapping (3dsmax2009).
Use PFlow Material IDs
This setting only works with Particle Flow. If checked, then each particle trail will inherit the material ID of its source particle. Use the Material Frequency operator in Particle Flow to assign these.
Snapshot Path
This button generates a spline object from the paths taken by all the particle trails.